E2E Testing
E2E Testing consists of runnig a local environment, and automating interaction with the browser to test the widgets behaviour.
With FlowFuse Dashboard, we have the following commands which are used for testing:
npm run cy:server- Runs an instance of Node-RED with FlowFuse Dashboard installed.npm run cy:run- Runs all of the Cypress tests in headless mode.npm run cy:open- Opens the Cypress test runner, whereby you can explicitly choose which tests to run locally.
Cypress
For our E2E testing we use Cypress. This provides a framework by which we can define automated tests that will click on and interact with relevant elements in our Dashboard, and check against expected behaviours.
Running Tests
Install Node-RED Testing Instance
Cypress has been configured to run a local instance of Node-RED with the FlowFuse Dashboard installed. You will need to install the dependencies for this instance:
cd ./cypress/fixtures/user-dir/
npm install
Running Test Server
To run the test server, you will need to run the following command from the root of the repository:
npm run cy:serverThe test server will run at http://localhost:1881, and any resulting Dashboard will be available at http://localhost:1881/dashboard.
Open Cypress
To open the Cypress test runner, you will need to run the following command from the root of the repository:
npm run cy:openSelect "E2E Testing, and then the browser of your choice. Following this, you'll see a list of the available tests, which you can then run individually.
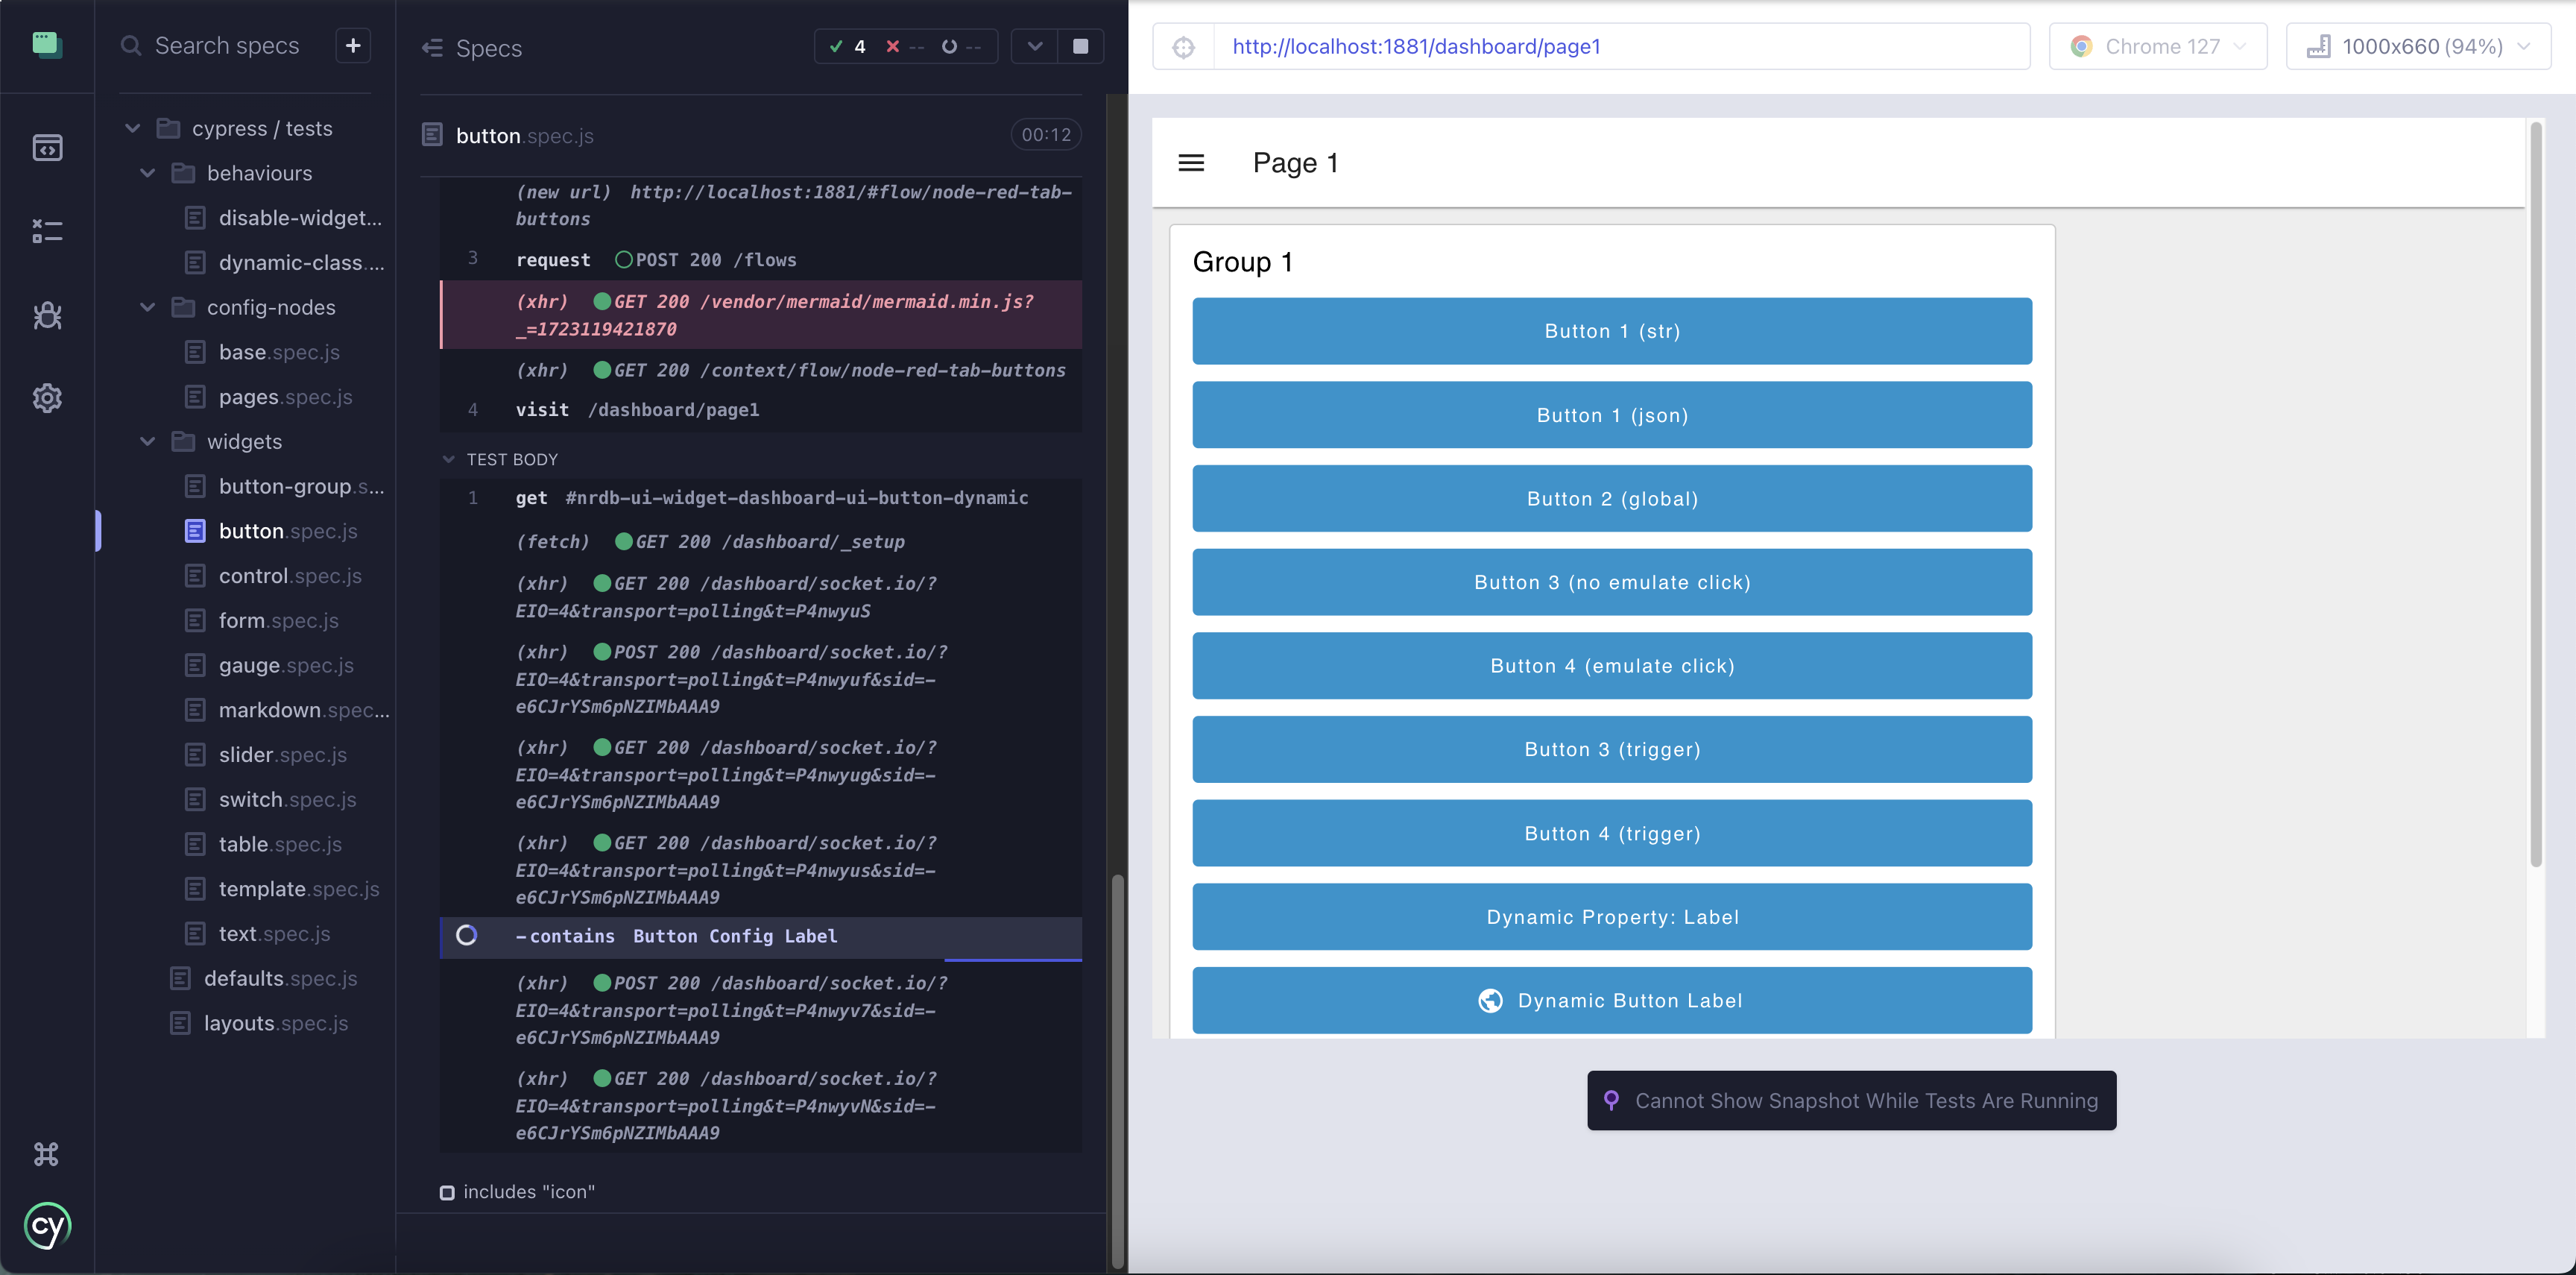 Screenshot showing the UI Button tests running in the Cypress Test Runner
Writing Tests
With Node-RED and FlowFuse Dashboard, we want to be able to provide a complete flow.json, and then test the behaviour of the Dashboard that is deployed as a result of that flow.
As such, each set of tests contains two key parts:
<widget>.json- theflows.jsonthat details the test flows to deploy, stored in/cypress/fixtures/flows<widget>.spec.js- the test suite that defines what elements to interact with and the states to test, stored in/cypress/tests/
1. Building Test Flows
Each test suite will have a corresponding flows.json file that details the flow to deploy to the local Node-RED instance. This will contain the necessary nodes to test the behaviour of the widget in question.
The easiest way to build this flow.json is in Node-RED itself:
- Build the flow you want to test in a local Node-RED instance
- Export it as JSON
- Save the exported
jsoninto ajsonfile within/cypress/fixtures/flows
You may also want to make the most of the Cypress Test Helpers too.
2. Example spec.js file
To reference your relevant flow.json, you can use the cy.deployFixture helper function which will load the flow into the local Node-RED instance.
describe('FlowFuse Dashboard - Button Groups', () => {
    // anything here will run before all of the indivudal tests below
    beforeEach(() => {
        // here we can use our helper command to load a flow.json
        cy.deployFixture('dashboard-button-groups')
        // then make sure we're starting on the correct page for each test
        cy.visit('/dashboard/page1')
    })

    // it('') specifies a new test
    it('can be clicked and emit a string value representing the option', () => {
        // clickAndWait is a helper command that clicks on an element and waits for a set time
        cy.clickAndWait(cy.get('button').contains('Option 3'))

        // checkOutput then utilises the Helper APIs we have in place tho check what output came from the button
        cy.checkOutput('msg.topic', 'first-row')
        cy.checkOutput('msg.payload', 'option_3')
    })

    it('allows for definition of custom colouring for options', () => {
        // Click the last button in the button group
        cy.clickAndWait(cy.get('#nrdb-ui-widget-ui-button-group-colors button').last())

        // check the CSS is applied correctly
        cy.get('#nrdb-ui-widget-ui-button-group-colors button').last()
            .should('have.css', 'background-color', 'rgb(217, 255, 209)')
    })
})
Cypress Test Helpers
Click & Wait
cy.clickAndWait(<element>)
Cypress will automatically wait for elements to appear in the DOM before interacting with them, and wait for HTTP requests when instructed, however, it cannot perform the same for Websocket traffic.
Given that most tests will involve checking for the conasequences of SocketIO traffic, we've created a Cypress "command", clickAndWait() which ensures a set time period after clicking before moving onto the next phase of a test.
Store Output (Function Node)
In order to make it easier to write tests, we have created a helper function which can be used to test the output from particular widgets. This function node can be included in your Node-RED flow, and it will store the msg object in a global
The "Store Latest Msg" function node here contains:
global.set('msg', msg)
return msg;
When a button is clicked in the Dashboard, the value emitted by that button is then stored in a global msg variable. We can then use this in conjuction with checking that output.
Check Output
cy.checkOutput(<key>, <value>)
If using the above Store Output function node, we can then use the checkOutput command to check the value of the msg object against what we expect it to be.
This helper flow is automatically deployed to the Node-RED instance when using the deployFixture(<fixture>) command.
For example, from our button tests:
describe('FlowFuse Dashboard - Buttons', () => {
    beforeEach(() => {
        cy.deployFixture('dashboard-buttons') // reads in a flow.json and deploys it to the local Node-RED instance
        cy.visit('/dashboard/page1')
    })

    it('can be clicked and outputs the correct payload & topic are emitted', () => {
        // Emitting strings
        cy.clickAndWait(cy.get('button').contains('Button 1 (str)'))
        // checkOutput calls our helper endpoints to checks the values against the stored msg
        cy.checkOutput('msg.payload', 'button 1 clicked')
        cy.checkOutput('msg.topic', 'button-str-topic')

        // Emitting JSON
        cy.clickAndWait(cy.get('button').contains('Button 1 (json)'))
        cy.checkOutput('msg.payload.hello', 'world')
        cy.checkOutput('msg.topic', 'button-json-topic')
    })
})
Reset Context
cy.resetContext()
The above function assists with setting and checking output that rely on Node-RED's "context" stores. This function can be used to be sure that you have a clean context store by restting it. This is best used before using the Store Output helper function to assign new values to the store.
Reload Dashboard
cy.reloadDashboard()
If at any point you want to reload the page, then utilising this command will refresh the page, but also ensure that the /_setup API call has finished, before proceeding with any more steps in your test.